Hello everyone,
It has been about a month since we announced the upcoming improvements to the Revit plugin. Here is an update on our progress!
We are still a couple of weeks away from the public release. Let us know if you want to try the model editor, and we will share the link to the WIP version of the installer with you! Similarly, let us know if there is a capability that can greatly benefit your workflows and is currently missing from the list.
What has changed?
Thanks to several of you who tried the WIP version of the Revit plugin’s model editor and provided feedback, we have added several new capabilities and improved the existing ones. The feedback so far has been overwhelmingly positive, and we hope these additions achieve the goal that we set in 2023 to minimize the need for additional work outside the Revit plugin.
Before
After
Here is a video that shows how one can use the new features to clean up the advanced Revit sample model. I tried to use all the available functionalities in one way or another. I hope you agree that it has never been this easy and quick to clean up your analytical models!

Click here for the video content breakdown
0:00 Introduction
1:05 Remove column holes
2:04 Remove column holes on the edges of the rooms
5:30 Pull rooms to a room
6:05 Grid size control
6:42 Align rooms in multi-level to a line
8:50 Drawomh local alignment lines
10:28 Stories table overview
11:00 Place missing rooms
13:36 Merge all the rooms on a level without clean-up
15:50 Split core and perimeter
18:50 Merge rooms and edit room display name
19:45 Fix overlapping skylights
20:33 Snap model to grid
22:35 Validate model
23:20 Export options
24:46 Upcoming commands, and closing remarks (not really!)
25:17 Offset the building envelop boundary to adjust for wall thickness
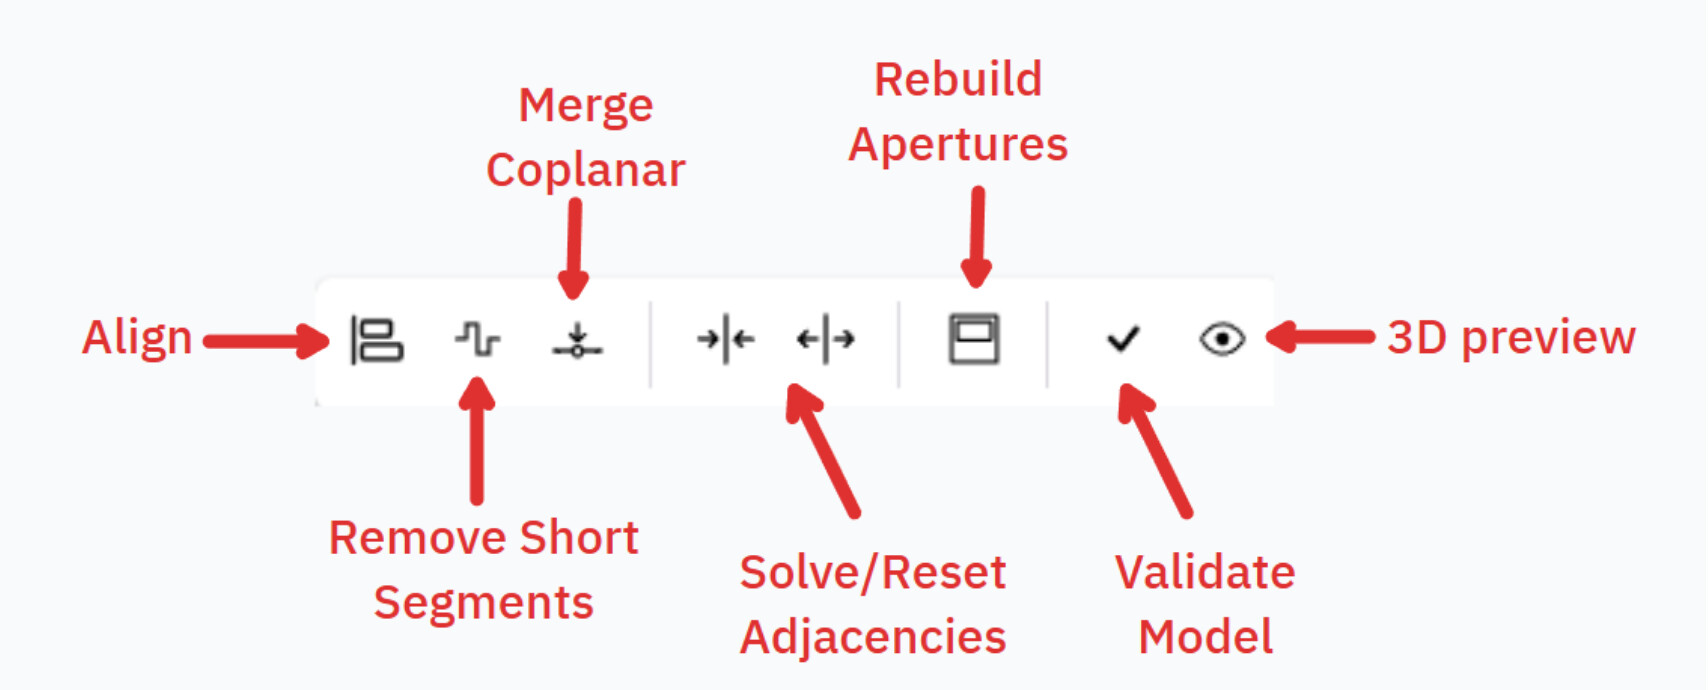
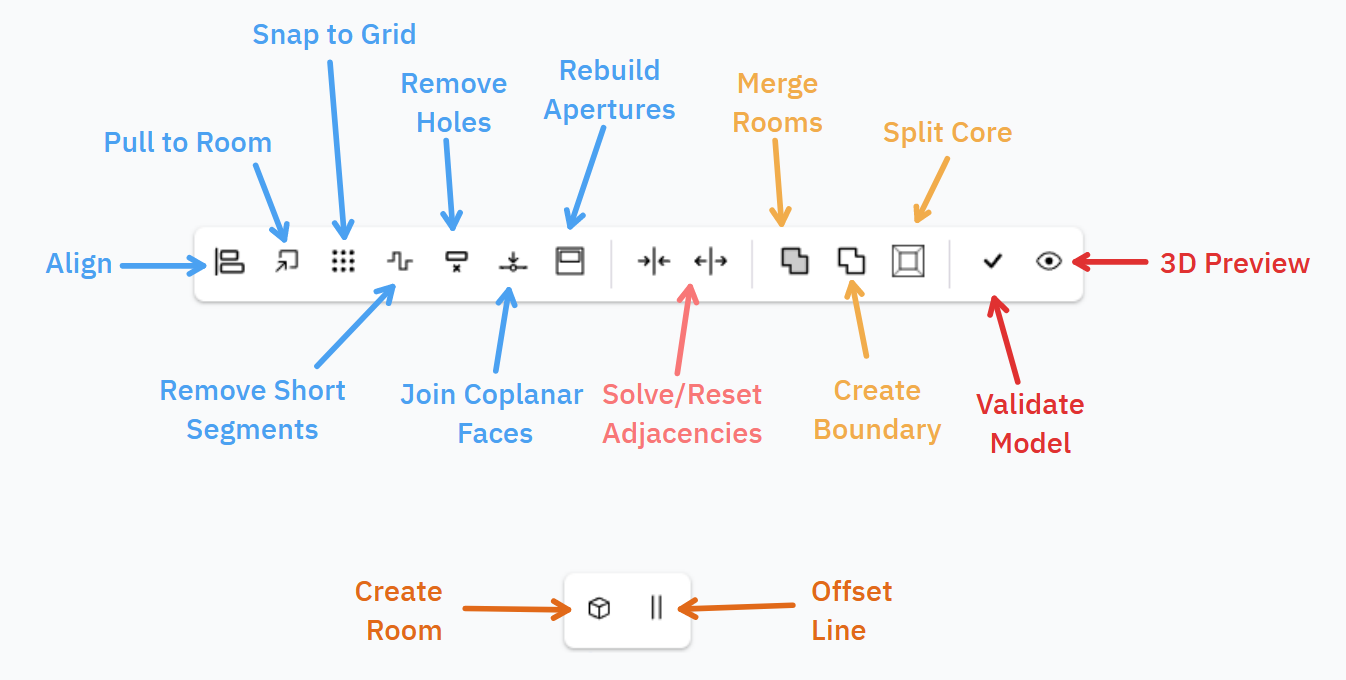
Here is a list of currently available commands for rooms and [alignment] lines.
Room Commands
Click here to see the full list of the room commands
Align
Align the selected rooms’ vertices to the selected lines/polylines if the room vertices lie within the specified Alignment Distance. Using the Snap Vertices option will perform an additional operation that tries to snap the vertices to line/polyline vertices after running the alignment.

This command is primarily useful for fixing the misalignments between rooms, which are common in the raw export of Revit rooms. It is also useful for adjusting the exterior boundary around entire stories, enabling you to align rooms to the inside or outside wall finish instead of using the wall centerline as is typical when exporting Revit rooms. See the Create boundary command for more information.
This command is only visible when at least one room and one alignment line/polyline is selected.
Pull to room
Pull the vertices of one or more rooms to the first “target” room in the selection. The operation of pulling can be thought of as aligning the rooms to the target room’s segments and then snapping to its vertices. Using the Coordinate Vertices option will run an additional operation to adjust the number of vertices in the rooms that were pulled. This results in better matching of segments between the rooms like so:


Snap to grid
Snap the selected rooms to a cartesian grid defined by a Grid Increment distance, which sets the resolution of the grid. This command is particularly useful for IES VE users who often need the model to be snapped to a grid.
Remove short segments
Remove the segments of the room polygon that are smaller than a certain specified Segment Distance. Use this command to remove column holes and other unwanted small segments at the edges of the rooms.
Remove holes
Remove the holes inside the room that are smaller than a certain specified Area Threshold. Use this command to remove column and duct holes from inside rooms.
Join coplanar faces
Join coplanar walls of the room, effectively removing colinear vertices from the room polygon. Use this command to simplify the geometry and clean up the model before running “solve adjacency” or “alignment” commands.
Rebuild apertures
Rebuild the apertures of the rooms by merging the colliding apertures and trimming those that extend past the parent Face. The Rectangle option can be used to further simplify non-rectangular apertures into rectangular shapes.
Solve adjacency
Solve adjacency between selected rooms by assigning interior boundary conditions where rooms touch one another. You can optionally turn off the Ceiling Adjacency if you are primarily interested in simulating each Story as a distinct unit with adiabatic floors and ceilings. This command will only be visible when more than one room is selected.
Reset adjacency
Reset all of the wall boundary conditions to outdoors. Use this command to create a clean starting point for running “solve adjacency” or “alignment” commands.
Merge rooms
Merge several rooms into a single room. Setting a Merge Distance that is larger than 0 will allow you to merge rooms that have gaps in between them (crossing gaps up to the specified distance). This option is particularly useful for IDA ICE users who must work with rooms that are exported at the interior wall finish.
Create boundary
Create polyline boundaries around a selection of rooms. The command can return polylines for either the exterior border around the rooms or just the holes (or both). You can use the generated borders for aligning the existing rooms or creating new rooms. See line commands for the full list of the available commands.
Split core and perimeter
Create core and perimeter rooms for a selected room. This is particularly useful for creating models according to typical zoning practices, where each façade orientation is a separate zone. The perimeter rooms will have a depth equal to the specified Perimeter Offset and the Air Boundary option lets you optionally set the boundaries between the core and perimeter rooms to an air boundary if the room being split represents an open space. It is recommended to clean up small edges and join coplanar faces before running this command.
Validate model
Run the validation routine for the selected rooms. Valid models should export to any of the supported BEM engines without errors. Invalid models will have their errors presented in a table with the option to zoom in on the part of the model where the error originates so that it can be fixed.
3D preview
Show the selected rooms in 3D. The 3D preview shows up in a new floating window.
Line Commands
Click here to see the full list of the line commands
Offset
Offset the selected lines and/or polylines. The Offset Distance can be either positive or negative and positive values will be interpreted as offsetting outwards or “to the right” while negative numbers will be offset inwards to “to the left”.
Create room
Create room from selected closed polylines. Set the room display name, and adjust the Floor Height and Floor to Ceiling Height if needed. By default, the command uses the heights of the current active story.
Upcoming commands
Click here to see the full list of the upcoming commands
Subtract rooms
Subtract one room from another room. Use this command to clean up colliding rooms by subtracting one room from another.
Split room
Split a room into smaller rooms by using a line or polyline.
Generate alignment lines
Generate a collection of proposed alignment lines for selected rooms by evaluating the common axes across the room polygon segments.
Remove colinear vertices
Remove colinear vertices from a polyline.
Next steps
We are actively working on adding the last few remaining commands as well as improving the integration between the editor and the Revit plugin. We are also experimenting with integrating the model editor with the Rhino plugin and the Pollination web platform.
Our goal is to release a new version of the Revit and Rhino plugins before the upcoming SimBuild 2024 workshops. If you are attending the Simbuild 2024 in Denver and would like to learn how to use the model editor, we still have seats available in our workshops. See here for more information.
As always, we are looking forward to hearing your suggestions and feedback!